Saturday, February 7, 2015

How To Install Windows 8 or 8.1 From a USB Device

Instructions on Using a USB Flash Drive To Install Windows 8 or 8.1


Photo of a SanDisk SDCZ33-008G-B35 Flash Drive -
SanDisk Cruzer Low-Profile Flash Drive. 
The need to install Windows 8 or Windows 8.1 from a USB device, like a flash drive, is a common one these days.
It's no surprise why - many new computers, especially tablets and smaller laptops and desktops, no longer have optical drives.
That Windows 8 install disc doesn't do you much good if you don't have anywhere to put the DVD!
Prefer screen shots? Try my Step by Step Guide to Installing Windows 8/8.1 From a USB Device for an easy walk-through!
Windows 10 Users: See my How to Burn an ISO File to a USB Drive for an easier way of getting the Windows 10 Technical Preview ISO image to a USB drive for installation.
If you want to install Windows 8 from a USB device, you'll need to get those setup files from the DVD to the USB drive. Unfortunately, simply copying them there won't do. Windows 8 is also sold as a downloadable ISO file which, if you choose to buy Windows 8 that way, requires similar steps to get it properly copied to a USB drive.
Regardless of whether you have a Windows 8 DVD you need to get on a flash drive, or a Windows 8 ISO file with the same goal, the following tutorial will help you get the Windows 8 installation files properly copied to a flash drive so you can get on with the installation process.
Difficulty: Average
Time Required: Getting the Windows 8 installation files onto a flash drive or other external USB device will take between 20 and 30 minutes, depending on what format your copy of Windows 8 is in right now and how fast your computer is.
Applies To: The following procedure applies equally to Windows 8 (standard) or Windows 8 Pro, as well as those editions of Windows 8.1.
Requirements:
  • A flash drive (4 GB for 32-bit, 8 GB for 64-bit)
  • A Windows 8/8.1 DVD or ISO [Buy: Microsoft | Other] (See Where Can I Download Windows 8 or 8.1? for more options)
  • Access to a working computer (with a DVD drive if you have a Windows 8 DVD) with Windows 8, Windows 7, Windows Vista, or Windows XP installed
Important: If you have a Windows 8 ISO file and want that on a flash drive, start with Step 2. If you have a Windows 8 DVD and need that on the flash drive, start with Step 1.

How To Install Windows 8 or 8.1 From a USB Device

  1. Create an ISO file from the Windows 8 DVD. This is the procedure by which you create a single file, called an ISO image, that contains all the data stored on the Windows 8 setup DVD disc.

    Once you have an ISO image created from your Windows 8 disc, come back here and continue on with this tutorial which will explain how to get that ISO file onto a flash drive.

    Note: If you already know how to create ISO files with your favorite program, often called "ripping," then do so in whatever way you're used to doing it. However, if you've never created an ISO image, or don't have a program installed right now that does it, please see the linked tutorial above for complete instructions on doing so with a free program.
     
  2. Download the Windows 7 USB/DVD Download Tool from Microsoft and then install it.

    This free program from Microsoft properly formats your flash drive and then copies the contents of the Windows 8 installation ISO file you have to that flash drive.

    Note: Don't worry that this program has Windows 7 in the title. This program works perfectly well with Windows 8 ISO files and can be used in Windows 8, Windows 7, Windows Vista, or Windows XP.
     
  3. Start the Windows 7 USB DVD Download Tool program. You should be able to find the shortcut on the Desktop, as well as in your Start menu or on your Start screen, depending on which version of Windows you installed the program on.
     
  4. Click Browse on the Step 1 of 4: Choose ISO file screen.
     
  5. Locate, and then select, your Windows 8 ISO file. Then click or touch Open.

    Note: If you downloaded Windows 8 from Microsoft, check your Downloads folder or your Desktop for the ISO image. If you created an ISO image from your Windows 8 DVD, the ISO file will be wherever you created it to.
     
  6. Click or touch Next.
     
  7. Choose USB device on the Step 2 of 4: Choose media type screen.

    Note: As you can see here, there is also a DVD option. While it doesn't do us much good in this case, since the end game is to get Windows 8's setup files on a flash drive, you could also use this tool to burn a Windows 8 ISO image to a DVD or BD disc.
     
  8. On the Step 3 of 4: Insert USB device screen, choose from the drop-down box the flash drive or USB-connected external hard drive you want to put the Windows 8 setup files onto and then touch or click Begin copying.

    Tip: If you haven't yet plugged in the USB storage device you're planning on using, you can do that now and then touch or click the blue refresh button to make it show up in the list.
     
  9. Click or touch Erase USB Device if you're prompted to do so on a Not Enough Free Space window. If you don't see this, don't worry, it just means that your flash drive or external hard disk is already empty.

    Important: If this message didn't make it apparent, you should know that whatever data you might have on this drive is going to be erased as part of the process of getting the Windows 8 setup files copied.
     
  10. On Step 4 of 4: Creating bootable USB device, just wait for the Windows 7 USB DVD Download Tool to prepare the drive and copy the Windows 8 installation files to it.

    The first Status you see will be Formatting, which will take anywhere from a few to several seconds, depending on how large the USB drive is that you're using. Next will be Copying files which could take anywhere from 15 to 30 minutes, possibly longer, depending on which Windows 8 ISO file you're working from, as well as on how fast your flash drive, USB connection, and computer is.

    Tip: Don't worry if the percentage indicator jumps ahead quickly but then sits on a single number for a very long time. While it might not make a lot of sense to behave that way, it doesn't necessarily mean anything is wrong.
     
  11. Assuming everything went as planned, the next screen should say Bootable USB device created successfully with a Status that says Backup completed.

    You can now close the Windows 7 USB DVD Download Tool program window. The flash drive, or other external USB drive you're using, now has the necessary files on it to install Windows 8 and is also properly configured to be booted from.
     
  12. Boot from the USB device that you just created to start the Windows 8 install process.

    Tip: If the Windows 8 setup process doesn't start, it's very likely that you'll need to make boot order changes in the BIOS.
    Tip: If you have a UEFI based system and you still can't boot Windows 8 Setup from the flash drive, even after setting the USB device first in the boot order, see Tip #1 below for help.

Tips & More Information

  1. The Windows 7 USB DVD Download Tool formats the USB drive as NTFS, a file system that many UEFI based computers will not boot from when on a USB drive.

    To work around this issue, do this:
     
    1. After Step 11 above, copy all of the files from the flash drive to a folder on your PC.
    2. Format the flash drive manually, using the older FAT32 file system.
    3. Copy all of the files from the folder you made in Step 1 back to the flash drive.
    4. Repeat Step 12 above.
  2. There is an alternative method for getting a Windows 8 or 8.1 ISO image properly onto a USB drive. See How to Burn an ISO File to USB for a walkthrough. I prefer the procedure I've outlined above, but if you have trouble with it, that general ISO-to-USB procedure should work as well.

How To Install Windows 8 or 8.1 From a USB Device

Instructions on Using a USB Flash Drive To Install Windows 8 or 8.1

Photo of a SanDisk SDCZ33-008G-B35 Flash Drive -
SanDisk Cruzer Low-Profile Flash Drive. 
The need to install Windows 8 or Windows 8.1 from a USB device, like a flash drive, is a common one these days.
It's no surprise why - many new computers, especially tablets and smaller laptops and desktops, no longer have optical drives.
That Windows 8 install disc doesn't do you much good if you don't have anywhere to put the DVD!
Prefer screen shots? Try my Step by Step Guide to Installing Windows 8/8.1 From a USB Device for an easy walk-through!
Windows 10 Users: See my How to Burn an ISO File to a USB Drive for an easier way of getting the Windows 10 Technical Preview ISO image to a USB drive for installation.
If you want to install Windows 8 from a USB device, you'll need to get those setup files from the DVD to the USB drive. Unfortunately, simply copying them there won't do. Windows 8 is also sold as a downloadable ISO file which, if you choose to buy Windows 8 that way, requires similar steps to get it properly copied to a USB drive.
Regardless of whether you have a Windows 8 DVD you need to get on a flash drive, or a Windows 8 ISO file with the same goal, the following tutorial will help you get the Windows 8 installation files properly copied to a flash drive so you can get on with the installation process.
Difficulty: Average
Time Required: Getting the Windows 8 installation files onto a flash drive or other external USB device will take between 20 and 30 minutes, depending on what format your copy of Windows 8 is in right now and how fast your computer is.
Applies To: The following procedure applies equally to Windows 8 (standard) or Windows 8 Pro, as well as those editions of Windows 8.1.
Requirements:
  • A flash drive (4 GB for 32-bit, 8 GB for 64-bit)
  • A Windows 8/8.1 DVD or ISO [Buy: Microsoft | Other] (See Where Can I Download Windows 8 or 8.1? for more options)
  • Access to a working computer (with a DVD drive if you have a Windows 8 DVD) with Windows 8, Windows 7, Windows Vista, or Windows XP installed
Important: If you have a Windows 8 ISO file and want that on a flash drive, start with Step 2. If you have a Windows 8 DVD and need that on the flash drive, start with Step 1.

How To Install Windows 8 or 8.1 From a USB Device

  1. Create an ISO file from the Windows 8 DVD. This is the procedure by which you create a single file, called an ISO image, that contains all the data stored on the Windows 8 setup DVD disc.

    Once you have an ISO image created from your Windows 8 disc, come back here and continue on with this tutorial which will explain how to get that ISO file onto a flash drive.

    Note: If you already know how to create ISO files with your favorite program, often called "ripping," then do so in whatever way you're used to doing it. However, if you've never created an ISO image, or don't have a program installed right now that does it, please see the linked tutorial above for complete instructions on doing so with a free program.
     
  2. Download the Windows 7 USB/DVD Download Tool from Microsoft and then install it.

    This free program from Microsoft properly formats your flash drive and then copies the contents of the Windows 8 installation ISO file you have to that flash drive.

    Note: Don't worry that this program has Windows 7 in the title. This program works perfectly well with Windows 8 ISO files and can be used in Windows 8, Windows 7, Windows Vista, or Windows XP.
     
  3. Start the Windows 7 USB DVD Download Tool program. You should be able to find the shortcut on the Desktop, as well as in your Start menu or on your Start screen, depending on which version of Windows you installed the program on.
     
  4. Click Browse on the Step 1 of 4: Choose ISO file screen.
     
  5. Locate, and then select, your Windows 8 ISO file. Then click or touch Open.

    Note: If you downloaded Windows 8 from Microsoft, check your Downloads folder or your Desktop for the ISO image. If you created an ISO image from your Windows 8 DVD, the ISO file will be wherever you created it to.
     
  6. Click or touch Next.
     
  7. Choose USB device on the Step 2 of 4: Choose media type screen.

    Note: As you can see here, there is also a DVD option. While it doesn't do us much good in this case, since the end game is to get Windows 8's setup files on a flash drive, you could also use this tool to burn a Windows 8 ISO image to a DVD or BD disc.
     
  8. On the Step 3 of 4: Insert USB device screen, choose from the drop-down box the flash drive or USB-connected external hard drive you want to put the Windows 8 setup files onto and then touch or click Begin copying.

    Tip: If you haven't yet plugged in the USB storage device you're planning on using, you can do that now and then touch or click the blue refresh button to make it show up in the list.
     
  9. Click or touch Erase USB Device if you're prompted to do so on a Not Enough Free Space window. If you don't see this, don't worry, it just means that your flash drive or external hard disk is already empty.

    Important: If this message didn't make it apparent, you should know that whatever data you might have on this drive is going to be erased as part of the process of getting the Windows 8 setup files copied.
     
  10. On Step 4 of 4: Creating bootable USB device, just wait for the Windows 7 USB DVD Download Tool to prepare the drive and copy the Windows 8 installation files to it.

    The first Status you see will be Formatting, which will take anywhere from a few to several seconds, depending on how large the USB drive is that you're using. Next will be Copying files which could take anywhere from 15 to 30 minutes, possibly longer, depending on which Windows 8 ISO file you're working from, as well as on how fast your flash drive, USB connection, and computer is.

    Tip: Don't worry if the percentage indicator jumps ahead quickly but then sits on a single number for a very long time. While it might not make a lot of sense to behave that way, it doesn't necessarily mean anything is wrong.
     
  11. Assuming everything went as planned, the next screen should say Bootable USB device created successfully with a Status that says Backup completed.

    You can now close the Windows 7 USB DVD Download Tool program window. The flash drive, or other external USB drive you're using, now has the necessary files on it to install Windows 8 and is also properly configured to be booted from.
     
  12. Boot from the USB device that you just created to start the Windows 8 install process.

    Tip: If the Windows 8 setup process doesn't start, it's very likely that you'll need to make boot order changes in the BIOS.
    Tip: If you have a UEFI based system and you still can't boot Windows 8 Setup from the flash drive, even after setting the USB device first in the boot order, see Tip #1 below for help.

Tips & More Information

  1. The Windows 7 USB DVD Download Tool formats the USB drive as NTFS, a file system that many UEFI based computers will not boot from when on a USB drive.

    To work around this issue, do this:
     
    1. After Step 11 above, copy all of the files from the flash drive to a folder on your PC.
    2. Format the flash drive manually, using the older FAT32 file system.
    3. Copy all of the files from the folder you made in Step 1 back to the flash drive.
    4. Repeat Step 12 above.
  2. There is an alternative method for getting a Windows 8 or 8.1 ISO image properly onto a USB drive. See How to Burn an ISO File to USB for a walkthrough. I prefer the procedure I've outlined above, but if you have trouble with it, that general ISO-to-USB procedure should work as well.

WiFi Hotspot For Windows 8.1/8/7 using Command Prompt

Advertisements
Hi guys,Today I am going to show you how to create WiFi hotspot network without using any software’s within 2 minutes by using your command prompt in Windows 7 or Windows 8.1/8. In my previous articles, I showed you how to create a WiFi network in any windows PC or laptop using Connectify software. This methods works well with all Windows versions 8/7/8.1. Windows 8 users just scroll down up to step 1.
Advertisements
Two methods are different. You can use any method in Windows 8.1 but for Windows 8 you should follow the article or other references given in the tutorial. If you don’t find the Internet Sharing option like in the below Video follow the below Command Prompt method or this connectify method (this method is 100 percent perfect) for Windows 8.1. CMD method might not work some times.
This Command Prompt method is only for technical people like you . You may get some problems. I highly recommend the software procedure for everyone Where you can create hotspot with few clicks. Most of the times you cannot access internet in your mobiles using this method so my suggestion is to use this method. Anyway you can give it a try for command prompt method. If you face any issues with this method try this one >>This is 1000% perfect to create hotspot.

Step 1: To Create WiFi Hotspot in Windows 8,8.1, Windows 7 PC

First you need to know that whether your PC hardware supports hotspot feature or not. To check this follow the instructions.
Advertisements
  • Open your command prompt in administrative mode(if you don’t know this post your comment I will tell you) .Enter this command :::
netsh wlan show drivers
Create Wifi hotspot in windows 8.1If it show “yes” as you can in image you can create WiFi hotspot in your PC. Go ahead you’re almost done. If it shows No you PC can’t create hotspot. Don’t close your command prompt until i say close it because we need it again.

Step 2 : To Create WiFi Hotspot Network in Windows Laptops

  • Enter the below command (your CMD must be open in administrative mode). Share to unlock the command.
netsh wlan set hostednetwork mode=allow ssid=www.FastTechBuzz.com key=FastTechBuzz
  • Hit enter then you will see like in below image.If you see image like below then your doing right.Now your hotspot is activated in your PC.
Create hotspot networki in LaptopHere FastTechBuzz.com is your WiFi name and FastTechBuzz is your password. You can change your password if you want.
Recommended For Windows PC Users

Step 3: To Create WiFi Hotspot in Windows 8,8.1/7 Computers

This is to switch on the created WiFi network Again Enter the below command.
netsh wlan start hostednetwork
Press Enter >> now you will see the command prompt as below. Now can close your CMD if you want. your hotspot is created you can see it in your other devices.
Create Hotspot using command prompt

Solutions for common WiFi Hotspot Errors in Windows 8.1/8:

  • If you are getting obtaining IP address in your TABLET or mobile (or)
  • Hosted Network couldn’t be started or Any other errors while creating hotspot please use any reputed software like connectify...

Step 4: Share Internet Connection in Windows 8/8.1/7

This is to share internet connection with other devices. For this
  • Click on windows button in your keyboard .
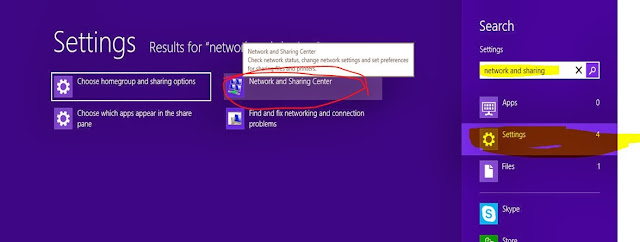
  • Then type Network and sharing as shown in below image
  • click on settings there highlighted with yellow then click on the red marked option.
Network and sharing windows 8.1
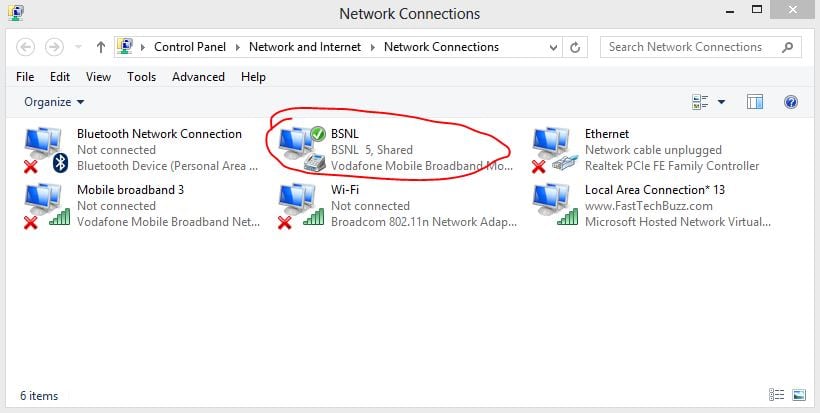
After clicking on that red marked option you will see a window then @Left side top CLICK ON CHANGE ADAPTER SETTINGS then you will see a window like below there you can see the created hotspot name with Local area connection 13.
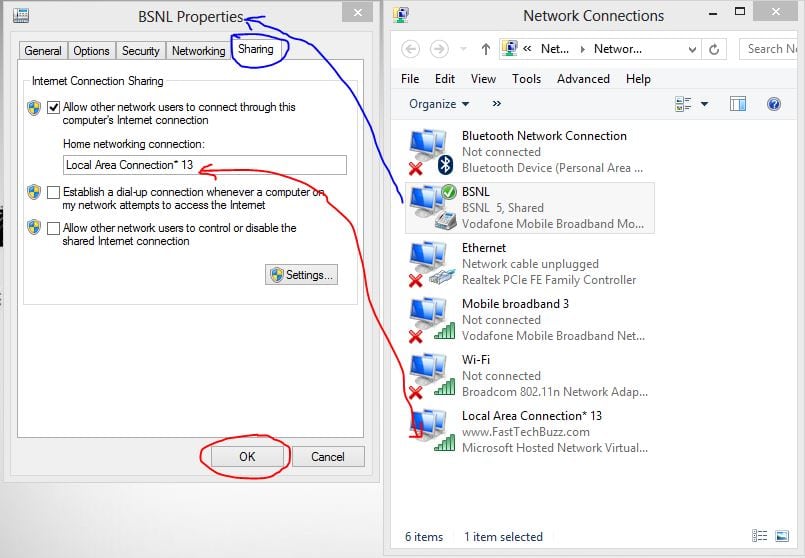
share wifi hotspotNext choose your presently using internet connection (Here i am connected to internet using my BSNL modem) and right click on it and open properties >> then go sharing tab >>choose Local Area network under Home Networking condition as shown in below image click on OK.hotspot command
Then click OK.Your are done.
If you have any problems post your comments below. I am ready to help you guys. Don’t forget to subscribe to our blog. What’s next ?

Friday, February 6, 2015

Make WiFi Hotspot in Windows 7/8.1/8/XP PC/laptop With Connectify Hotspot Pro

Advertisements
In present generation most of the people are having smartphone,PC,tablet in their home.So we all need internet for all these devices,Every one will be having internet connection for sure but few them only have routers with them in home so if we want use internet in all devices we must have to take another data plan.So this will increase our daily life spending. 

Guide to Make WiFi Hotspot Windows 7 or Windows 8.1/8 PC/Laptop

If you want to use your PC internet connection to all of your tablets and smart phones n by creating WiFi hotspot in Windows 8.1 or Windows 8/7 PC then the best solution to make WiFi network in your home is the below method.

It is very very easy to create WiFi hotspot in windows 7,8 PC.There are only few softwares available for this but today I am going to tell you about the best software.I will tell you how to create WiFi network using the best software.
If you are ready to create WiFi hotspot network in your Windows 7 PC then follow the below instructions.

How to create WiFi hotspot in windows 8/8.1,Windows 7/XP using connectify

Download the latest version of connectify Hotspot from this link. Remember this software is not free but I am giving a link to full version. Official site will give you 2 day trail version only.
  1. Install the software in your PC. (if you have any problems in installation post your problems in comments)
  2. Restart your PC after installing the software.
  3. After installing open the software from installed applications then you will see a image like below.
  4. Then enter your WiFi name, password click on start.
  5. That’s it your are done.
  6. If you want to use full features of Connectify – hotspot you have to buy full version and support the developers.
  7. you can see who are using your WiFi in clients tab that is marked in red color. Create WiFi Hotspot Windows8.1

Features of Connectify Hotspot Pro for Windows 7 or Windows 8/8.1 Computer

  • you can share your internet connection with full speed within the range of WiFi network.
  • You can protect your WiFi with password.
  • You can share your files also easily.
  • Play multiple player games between any number of computers
  • Price-$25
  • Rating-4.7/5
  • Rating given by 5722 users-(rating taken from the web)

Don’t for get these steps

  • Make sure that you turned on your WiFi adapter
  • Must restart your computer

Tuesday, February 3, 2015

How to Boot and Install Linux on a UEFI PC With Secure Boot

ubuntu-on-surface-pro-2
New Windows PCs come with UEFI firmware and Secure Boot enabled. Secure Boot prevents operating systems from booting unless they’re signed by a key loaded into UEFI — out of the box, only Microsoft-signed software can boot.
Microsoft mandates that PC vendors allow users to disable Secure Boot, so you can disable Secure Boot or add your own custom key to get around this limitation. Secure Boot can’t be disabled on ARM devices running Windows RT.

How Secure Boot Works

PCs that come with Windows 8 and Windows 8.1 include UEFI firmware instead of the traditional BIOS. By default, the machine’s UEFI firmware will only boot boot loaders signed by a key embedded in the UEFI firmware. This feature is known as “Secure Boot” or “Trusted Boot.” On traditional PCs without this security feature, a rootkit could install itself and become the boot loader. The computer’s BIOS would then load the rootkit at boot time, which would boot and load Windows, hiding itself from the operating system and embedding itself at a deep level.
Secure Boot blocks this — the computer will only boot trusted software, so malicious boot loaders won’t be able to infect the system.
On an Intel x86 PC (not ARM PCs), you have control over Secure Boot. You can choose to disable it or even add your own signing key. Organizations could use their own keys to ensure only approved Linux operating systems could boot, for example.
secure-boot-violation-invalid-signature-detected

Options for Installing Linux

You have several options for installing Linux on a PC with Secure Boot:
  • Choose a Linux Distribution That Supports Secure Boot: Modern versions of Ubuntu — starting with Ubuntu 12.04.2 LTS and 12.10 — will boot and install normally on most PCs with Secure Boot enabled. This is because Ubuntu’s first-stage EFI boot loader is signed by Microsoft. However, a Ubuntu developer notes that Ubuntu’s boot loader isn’t signed with a key that’s required by Microsoft’s certification process, but simply a key Microsoft says is “recommended.” This means that Ubuntu may not boot on all UEFI PCs. Users may have to disable Secure Boot to to use Ubuntu on some PCs.
  • Disable Secure Boot: Secure Boot can be disabled, which will exchange its security benefits for the ability to have your PC boot anything, just as older PCs with the traditional BIOS do. This is also necessary if you want to install an older version of Windows that wasn’t developed with Secure Boot in mind, such as Windows 7.
  • Add a Signing Key to the UEFI Firmware: Some Linux distributions may sign their boot loaders with their own key, which you can add to your UEFI firmware. This doesn’t seem to be a common at the moment.
You should check to see which process your Linux distribution of choice recommends. If you need to boot an older Linux distribution that doesn’t provide any information about this, you’ll just need to disable Secure Boot.
You should be able to install current versions of Ubuntu — either the LTS release or the latest release — without any trouble on most new PCs. See the last section for instructions on booting from a removable device.

How to Disable Secure Boot

You can control Secure Boot from your UEFI Firmware Settings screen. To access this screen, you’ll need to access the boot options menu in Windows 8. To do this, open the Settings charm — press Windows Key + I to open it — click the Power button, then press and hold the Shift key as you click Restart.
restart-from-settings-charm
Your computer will restart into the advanced boot options screen. Select the Troubleshoot option, select Advanced options, and then select UEFI Settings. (You may not see the UEFI Settings option on a few Windows 8 PCs, even if they come with UEFI — consult your manufacturer’s documentation for information on getting to its UEFI settings screen in this case.)
access-uefi-firmware-settings
You’ll be taken to the UEFI Settings screen, where you can choose to disable Secure Boot or add your own key.
surface-pro-2-uefi

Boot From Removable Media

You can boot from removable media by accessing the boot options menu in the same way — hold Shift while you click the Restart option. Insert your boot device of choice, select Use a device, and select the device you want to boot from.
After booting from the removable device, you can install Linux as you normally would or just use the live environment from the removable device without installing it.
windows-8-uefi-choose-boot-device

Bear in mind that Secure Boot is a useful security feature. You should leave it enabled unless you need to run operating systems that won’t boot with Secure Boot enabled.

Dual Booting Explained: How You Can Have Multiple Operating Systems on Your Computer

dual-boot-or-triple-boot-operating-systems
Most computers ship with a single operating system, but you can have multiple operating systems installed on a single PC. Having two operating systems installed — and choosing between them at boot time — is known as “dual-booting.”
Google and Microsoft ended Intel’s plans for dual-boot Windows and Android PCs, but you can install Windows 8.1 alongside Windows 7, have both Linux and Windows on the same computer, or install Windows or Linux alongside Mac OS X.

How Dual-Booting Works

Your computer’s operating system is generally installed on its internal hard drive. When you boot your computer, the BIOS loads the boot loader from the hard drive and the boot loader boots the installed operating system.
There’s no limit to the number of operating systems you he installed — you’re not just limited to a single one. You could put a second hard drive into your computer and install an operating system to it, choosing which hard drive to boot in your BIOS or boot menu. You could also boot an operating system — like a live Linux system or a Windows To Go USB drive — from external storage media.
Even if you only have a single hard drive, you can have multiple operating systems on that hard drive. By partitioning the drive into several different partitions, you can have one partition for one operating system and another partition for another operating system, splitting the drive between them. (In reality, many operating systems use multiple partitions. The point is you’re devoting part of the drive to one operating system and part of the drive to another.)
When you install a Linux distribution, it typically installs the Grub boot loader. Grub loads instead of the Windows boot loader at boot time if Windows was already installed, allowing you to choose the operating system you want to boot. Windows also has its own boot loader, which can be used to select between different versions of Windows if you have more than one installed.
dual-boot-partition-setup

Why Bother Dual-Booting?

Different operating systems have different uses and advantages. Having more than one operating system installed allows you to quickly switch between two and have the best tool for the job. It also makes it easier to dabble and experiment with different operating systems.
For example, you could have both Linux and Windows installed, using Linux for development work and booting into Windows when you need to use Windows-only software or play a PC game. If you like Windows 7 but want to try out Windows 8.1, you could install Windows 8.1 alongside Windows 7 and choose between the two at boot time, knowing you’ll always be able to go back to Windows 7. If you’re using a Mac, you can have Windows installed alongside Mac OS X and boot into it when you need to run Windows-only software.
You could use virtual machine software instead of setting up a dual-boot system, but a dual-boot system lets you actually use both operating systems on your hardware at full, native speed. You don’t have to deal with the overhead of a virtual machine, which is especially bad when it comes to 3D graphics. The downside is you can only use one of your installed operating systems at a time.
dual-boot-windows-8-and-windows-7

How to Service Your Own Computer: 7 Easy Things Computer Repair Places Do

assembling-desktop-computer
Computer repair places like Best Buy’s Geek Squad do a lot of things that you can easily do yourself. Instead of paying for a pricy malware removal or computer tune-up, you can do it yourself.
This guide won’t walk you through identifying a failing component and repairing it by hand. It’s focused on the easy stuff – although it’s easy, people pay hundreds of dollars to have it done for them.

Remove Viruses and Malware

Many people still wrestle with infected Windows PCs. If your computer is infected and isn’t working properly, you don’t have to pay someone else to fix it. The Geek Squad doesn’t have any magic tools – they use many of the standard antivirus tools you can use yourself.
For instructions on removing viruses – and preventing them from coming back – read: What To Do If You Get a Virus on Your Computer
For a really deep infection, a good repair place may dig through your autostart entries and registry by hand and manually remove malware that isn’t being caught by tools. However, this can be time-consuming – and if the computer is already so infected, there’s no guarantee all the malware will be removed. In cases like this, they’ll often just reinstall Windows. You can do that yourself, too.
image

Reinstall the Operating System

Some people think that computers become slower over time and eventually need to be replaced – it’s sad, but true. Other people may take the computer to a repair place when it starts slowing down. When dealing with a computer that’s become bogged down by startup programs and toolbars, a simple Windows reinstall is often the fastest, easiest solution.
This can also help if you’re experiencing other problems with your computer, such as file corruption or weird errors. While it’s often possible to troubleshoot these things by replacing corrupted files and bad drivers, it’s usually faster to just reset Windows back to its factory state.
Most new computers come with factory restore partitions, which you can access by pressing the correct key during the boot process (check your computer’s manual). You may also have CDs or DVDs you can restore your computer from. If you installed Windows yourself, you can use the Windows installation disc. On Windows 8, use the Refresh or Reset feature to easily reinstall Windows.
Be sure to back up your important files before doing this. Some places may back up your important files for you, while some may ask you to back them up ahead of time – that’s because they’ll just be reinstalling Windows for you.

Remove Included Bloatware

If you’ve just purchased a new computer – or reset your old computer back to its factory default state – you’ll often find it packed full of useless software. Computer manufacturers are paid to include these programs, which slow your computer down (particularly during the startup process) and clutter your system tray.
Best Buy’s Geek Squad will charge you to remove this bloatware. Even Microsoft is getting in on the action – if you bring a Windows PC to a Microsoft store, they’ll remove the bloatware for $99.
Don’t fall for it: You don’t have to pay a dime to remove these preinstalled programs. There are three ways you can go about doing this:
  • Use a program like PC Decrapifier. It will automatically scan your computer for bloatware and automatically uninstall it.
  • Open the Uninstall a program control panel and manually uninstall each piece of bloatware, one-by-one. If you do this on a new computer, be sure not to uninstall any hardware drivers. Everything else should be fair game.
  • Reinstall Windows. Many geeks like performing a fresh install of Windows on their new computers to start from a clean state. You’ll often have to download and install hardware drivers from your computer manufacturer’s website after the reinstall.

Build Your Own Computer

If you’re in the market for a new desktop computer (you can’t really build your own laptop), you don’t have to buy a prebuilt computer. It’s surprisingly easy to build your own computer from components you can order online. This is generally cheaper than building a new computer – you can get better hardware and choose exactly the hardware you want.

Upgrade Your RAM or Hard Drive

Some computer upgrades are particularly simple. Adding new RAM to your computer is a very simple process – as long as you buy the right RAM for your computer, installing it is will be easy (even in many laptops.) You can also upgrade your hard drive (or add a new hard drive) to increase the storage space you have available. This is a bit more complicated, as you’ll have to reinstall Windows or move your existing operating system over if you’re replacing the original hard drive, but it’s not too hard.

RMA Your Computer

If you bought a laptop or pre-assembled desktop computer, you don’t need to take it to a repair place if it breaks. If it’s still under warranty, you can contact the manufacturer to RMA the computer and have them repair it. RMA stands for “return merchandise authorization” – you’ll need to tell the manufacturer’s service department your problem and receive an RMA number before mailing it to their service center.
If you built your own computer from scratch, it can get a bit more complicated here – you’ll need to pin down which component is defective and RMA that component alone.
For information on RMA’ing your hardware if it breaks, consult your computer’s warranty documentation. You can also visit your computer manufacturer’s support website online.

Recover Deleted Files

If you’ve accidentally deleted an important file, you’ll be happy to know that it may be possible to recover it. This is because deleted files aren’t actually erased immediately.
If you need in-depth forensic data recovery of critical business documents, you might want to contact a professional for that. This is an expensive service, so unless it’s extremely important data, you may as well just try doing it yourself.
Read More:
  • How to Recover that Photo, Picture or File You Deleted Accidentally


These are all things you can do on your own fairly easily if you can follow instructions. We haven’t touched on the more complicated stuff here, but a lot of what people pay computer repair places to do is simple. This is the computer equivalent of changing your own windshield wiper fluid.

Don’t Be Intimidated: Building Your Own Computer is Easier Than You’d Think

kids-building-computer
Building your own computer is actually pretty simple. Don’t be afraid to dive right in — all you’ll need is a screwdriver, patience, and the ability to follow simple instructions.
This process is about building desktop PCs, of course. It’s nowhere near as easy to build your own laptop. If you did, you’d probably end up with a pretty bulky laptop!

Computer Building Demystified

The process of building your own computer can look awfully technical and intimidating. Buying a variety of components and carefully combining them into a finished product seems a bit much, but it’s not as hard as it looks.
Building a computer basically involves snapping together premade components. These components are designed to make assembly easy. You won’t need to use a soldering gun — most components will just snap into place and the most you’ll need to do is use a few screws. (The most complicated thing you might have to do is apply thermal paste between a CPU and a heat sink. Even this isn’t hard if you take your time and follow instructions, but you shouldn’t have to do this as the CPUs you buy will typically come with a heat sink attached.)
Really, the process of assembling a computer just involves the willingness to take your time and follow simple instructions.
assembled-computer

Picking and Buying Components

Before you assemble the computer, you’ll have to purchase the components you want. There are basic types of components that you’ll need to buy for any PC build, and you’ll need to ensure the components are compatible. You’ll also find many constantly updated guides online with lists of recommended components at various price ranges, designed to inform people buying computers of the best value components out there. New hardware is constantly being released and prices for current hardware are constantly declining, so such recommended components change often.
This isn’t a list of components you should buy, as that will go out-of-date quickly. Instead, this list outlines the type of components you’ll need — and why.
  • Case and Power Supply: You’ll need a box to put your computer components in — that’s the case. Cases typically come with power supplies. The power supply is the part of the computer that plugs into the electrical socket via a standard power cable. The other components inside the computer draw power from this power supply. There are different sizes of case out there, so be sure to get one that fits your components — you couldn’t use a tiny Mini-ITX case with a full-size desktop motherboard.
  • Motherboard: The motherboard is the base of your computer — the computer that everything else is connected to. The motherboard is mounted and screwed into place on the case and the power supply is connected to it. The power button on the case is connected to the motherboard so the computer can power up when you press the button on its case. Motherboards typically include networking and sound hardware, so you generally don’t need a separate network or sound card.
motherboard-with-cpu-plus-heat-sink-and-fan
  • CPU: The CPU is the part of your computer that does the calculations and most of the “work” — forgive our simplistic explanations here. CPUs typically come with heat sinks and possibly fans attached. These help cool the CPU and prevent it from becoming damaged due to heat. The CPU is inserted into the CPU socket on the motherboard.
  • RAM: The RAM is the working memory available to your computer. You can purchase RAM in sticks of different sizes and speeds and insert them into the RAM slots on the motherboard.
sticks-of-ram-on-motherboard
  • Graphics Card: Many motherboards come with built-in graphics hardware. However, if you want great 3D graphics performance, you’ll definitely want a separate graphics card. The graphics card is seated into a PCI-Express slot in the motherboard and the computer’s display is connected to the graphics card via an external cable. If you don’t plan on playing PC games, you’ll probably be fine with the graphics built into your motherboard.
  • Hard Disk: You’ll need a hard disk — ideally a solid-state drive for maximum speed — in your computer to install an operating system and boot from it. The hard disk is generally screwed into the appropriate spot in the case or inserted into a drive bay. It’s then connected to the power supply and the motherboard. DVD and Blu-Ray drives are connected in a similar way.
drives-in-hard-drive-bay
  • Display and Peripherals: Remember that you’ll need other components for your computer. The monitor, keyboard, mice, speakers, headphones, and other peripherals are all sold separately. Of course, you can use components you already have.
  • Operating System: Operating systems are also sold separately. Unless you want to use Linux or you have an unused Windows license sitting around, you’ll need to buy a boxed copy of Windows for around $100.
You’ll probably want to do a bit of research and find some up-to-date guides with the latest recommended hardware components in different price ranges. For example, the Build Your Own section of Tom’s Hardware maintains up-to-date guides with this information. Many other websites, particularly sites targeted at people building gaming PCs, offer similar guides

Assembling the Computer

Here’s how to assemble a computer in a nutshell: Open up your case and mount the motherboard inside it, screwing it into place. Connect the power supply cable and wires coming from the case to the motherboard. Insert the CPU into the CPU slot, place the sticks of RAM into the RAM sots, and insert the graphics card into the slot designed just for it. Screw your drive into the case or insert it into a drive bay. Connect the drive to the power supply and motherboard using the appropriate cables. Plug the computer in, power it on, and install an operating system. Beware of static electricity when handling the components!
Yes, this is definitely oversimplified — be sure to actually look up an in-depth guide or video if this is your first time building a PC — but it’s the process in a nutshell, and it’s pretty simple.
The internet is full of guides that will walk you through assembling your own computer — and, better yet, you can find many video guides that will walk you through the process. Read our overview of assembling a computer for more details details. Lifehacker also has a solid guide to actually assembling a computer, and you’ll find all the in-depth guides and videos you’ll need with a quick web search.
inserting-graphics-card-into-motherboard-slot

If you’re a normal computer user, there’s no real advantage to building your own computer anymore. But PC gamers still frequently assemble their own computers, and building your own computer still feels like a rite of passage for a PC geek.
If you have a problem after assembling your computer, you’ll need to pin down which component is failing so you can RMA it. You’ll have individual warranties on the components, but you won’t have a warranty on the system as a whole.

What You Need to Know About Upgrading Your Laptop’s Hardware

upgrade-laptop-hardware
Laptops aren’t as easy to upgrade as desktop PCs. In fact, newer laptops are becoming harder to upgrade — but you still may be able to upgrade your laptop with more RAM or a solid-state drive.
It’s generally a bad idea to buy a laptop with plans to upgrade it later. Buy the hardware you need to avoid headaches later. Some laptops can be upgraded fairly easily, but do your research here.

Desktops vs. Laptops

When you build a desktop PC yourself, a typical case will come with plenty of room inside. You can open it by twisting a few screws and get easy access to all the hardware in the case. Components you install aren’t permanent, but can be removed and replaced later. Even if you buy a prebuilt desktop PC, its motherboard may come with empty RAM slots and empty PCI Express slots so you can install more RAM and expansion cards. Some manufacturers may try to make upgrading their prebuilt desktop PCs more difficult, but even those PCs aren’t as difficult to upgrade as the average laptop.
Laptops are different. You don’t build your own laptop — instead, you buy a prebuilt laptop from a manufacturer. They build a custom chassis (case) for the laptop and choose components that will fit that case. Modern Intel Ultrabooks and Apple MacBooks are becoming increasingly thin and light, and they aren’t designed to be user-upgradable.
working-inside-a-macbook-pro

Barriers to Upgrading a Laptop

Here’s what often stops you from upgrading a laptop:
  • Design: Many laptops just aren’t designed to be opened. Take Microsoft’s Surface Pro 2 for example — you need to use a blow dryer to melt the adhesive around the display and open it up. Once you get inside, you’ll find a tightly packed together mess of components — the battery is also adhered to the case, so you can’t easily replace that. Apple’s MacBooks can be opened with a screwdriver (theoretically — they use proprietary screws), but you’ll find a tight mess of components with the battery glued in place, too.
  • Opening It: Even if opening your laptop is possible, it may not be a pleasant experience. Laptops have many components tightly packed together, so you may have to remove many other components from your laptop before servicing a specific component. For example, Microsoft’s Surface Pro 2 has over 90 screws inside it!
  • Soldered on Components: Some devices come with components soldered on. For example, MacBooks come with the CPU, GPU, and RAM soldered onto their logic board (or motherboard, as PC users call it). You can’t just remove any of these components and install a new one. (Soldering is the process of applying a melted metal material at high heat to two objects. The metal cools and the two objects — RAM and motherboard, in this case — become joined together by the metal. In other words, you can’t just remove a component because it’s fused to your motherboard.)
  • Warranty: Even if you can open your laptop and replace some of the components, most laptop manufacturers argue that this will void your warranty. If your laptop can easily be opened, you may have to remove a warranty-voiding sticker to get inside. The manufacturer may look for evidence you’ve tampered inside your laptop if you ever send it back. They’ll want to deny your warranty claim if they find any evidence you could have caused the problem. In theory, the manufacturer should have to honor the warranty whether you’ve opened the laptop or not if the problem isn’t your fault. But many PC manufacturers provide notoriously bad customer service, so good luck arguing that point with them!
inside-an-open-macbook-pro

Common Upgrades That Can Work

Many laptops can be upgraded in a few common ways. These upgrades will be easiest on older laptops, which are bulkier and often more upgrade-friendly.
  • Install More RAM: If your laptop’s motherboard has available RAM slots, it may be easy to buy another stick of RAM and pop it in. If your laptop’s RAM slots are full, it may be possible to remove the current sticks of RAM and install new sticks of RAM with more capacity. Some laptops (generally older, bulkier laptops) actually came with a special memory panel located on the bottom of the laptop, which you could easily open up to access the RAM slots on your motherboard. Be sure to buy the correct type of RAM for your laptop if you’re going this route.
  • Upgrade to an SSD: If you have a laptop that came with a slower mechanical hard drive, you may be able to upgrade it to a faster solid-state drive fairly easily. This process will involve opening up your laptop, removing the current hard drive, and installing the solid-state drive in its place. You’ll either need to create a copy of your operating system drive first or reinstall Windows afterward. Some larger laptops may have multiple hard drive bays, but don’t count on that.
  • Replace an Optical Drive With an SSD: If you want to keep your laptop’s internal drive and install a solid-state drive, you may be able to replace the laptop’s optical (CD, DVD, or Blu-ray) drive with a solid-state drive. You’ll need the appropriate enclosure that allows the SSD to fit into the optical drive bay for this.
CPU and GPU upgrades may be possible on some laptops, but these will be harder. You’ll need to make extra sure to buy compatible components that will fit your laptop and be supported by its BIOS. Different CPUs and GPUs generate different amounts of heat, so your new components may generate too much heat for the fans and cooling solutions that came with your laptop to handle. These are all problems you’ll need to think about.
upgrade-laptop-ram

Do Your Research

So, can you upgrade your laptop’s RAM or install a fast solid-state drive? Do your research! Look around online to see if your model of laptop is easily upgradable and if other people have upgraded its components successfully. Check exactly what type of RAM, solid-state drive, or other components your laptop supports.
Some laptop manufacturers provide service manuals that will walk you through the process of opening up your laptop and removing various components. Do a search to see if your laptop has an official service manual you can use. If not, you may find an unofficial guide for opening up your laptop and installing components written by another user.
Be sure to check the process ahead of time and see whether you’d feel comfortable following the instructions. Some upgrades will be much more difficult than others.
inside-a-sony-vaoi-laptop

You shouldn’t buy a laptop with plans on upgrading it. Ideas like, “Well, the RAM is a bit on the low side but I can always add more later,” or, “I’ll install a solid-state drive to speed it up,” can’t be taken for granted like they can with a desktop PC. Do your research ahead of time to see if this is even possible. Even if it is possible later, you may want to seek out  a laptop with your desired amount of RAM or a good solid-state drive and buy that instead, as it will save you a headache later.
Many laptops are still upgradable, but we’re moving toward a future where most computers won’t be user-serviceable.

How to Clean the Dust Out of Your Laptop

dusty-laptop-cooling-fan
If you’ve had your laptop for a year or two, it may be full of dust. Dust clogs fans, vents, and heat sinks, preventing your PC from cooling down properly. You can remove a good amount of this dust, even if you can’t open your laptop.
Dust build-up can prevent a PC from cooling down properly, and that heat can even cause hardware damage. Your laptop’s fans may also run at full blast, draining your battery. Your laptop may even reduce its performance to stay cool.

If You Can Open Your Laptop

Most laptops, especially newer ones, aren’t designed to be opened by their users. This presents a serious problem. On a desktop PC, you’d power down your PC, open the case, blow it out with a can of compressed air, and close the case. You could dust out a laptop in a similar way– if only there was a way to open it up and get inside.
Your laptop may have a bottom panel (or several bottom panels) you can unscrew to access the internals. Check your laptop’s manual, or look up a special “service manual” for your specific model of laptop online. Power down the laptop, remove the battery, and unscrew the panel to get at the laptop’s insides. If a service manual is available for your laptop, it will walk you through the process. Depending on your laptop, opening the panel may or may not void your warranty.
dusty-laptop-with-bottom-panel-removed
After it’s open, take the laptop somewhere you don’t mind getting dusty — like your garage, or even outside. Use a can of compressed air to blow out the internals of your laptop. Ensure you’re blowing the dust out of the laptop’s case, not just moving it around inside. For example, you could blow more toward your laptop’s vents so the dust would be blasted through the vents and out of the laptop. Be careful when blowing air at the fans in the laptop — if you make the fans spin too quickly, they could be damaged. Blow at the fans from many different angles, using short blasts of air.
We recommend compressed air — also known as canned air — for a reason. Don’t use a vacuum, and be extra careful if you opt to use an air compressor instead of a can of compressed air.
example-can-of-compressed-air
When you’re done, you can screw the panel back on, plug in the battery, and power the laptop back on. It’ll run cooler, and its fans should spin up less often.

If You Can’t Open Your Laptop

Whether you want to upgrade your laptop’s hardware or just dust it out, manufacturers don’t want you to open most laptops. But dust does build up inside a laptop, whether you can open it yourself or not.
Even if you can’t open your laptop, you can still attempt to dislodge some of that dust. First, take the laptop somewhere you don’t mind getting dusty. You probably don’t want to blow dust all over your desk or bed.
Get a can of compressed air, point it at the laptop’s cooling vents, and give them a few short bursts of air. With any luck, the jets of air will knock some of the dust loose and it will escape the laptop’s vents. You won’t get all the dust out of the laptop, but at least it will stop plugging up the vents, fans, and whatever else it’s stuck to. This isn’t the ideal way to dust out a laptop, but it may be all you can do.
Exercise caution when doing this. If you aim a blast of compressed air directly at a cooling fan inside a vent, you could cause the cooling fan to spin too quickly. Don’t aim the air directly at the fan and give it a long blast. Instead, blow air in short bursts, waiting in between to ensure you’re not spinning the fan too quickly.
laptop-cooling-vents
If your laptop has serious problems with overheating and you can’t clean it yourself, you may have to contact the manufacturer for service. If it’s still under warranty, they should hopefully help you.

If you’ve had your laptop for a year or two, there’s probably some significant dust build-up inside its case. Cleaning your laptop on a regular basis is a good idea, but you don’t need to go overboard and do this all the time. How often you need to clean your laptop depends on the laptop itself and how dusty your environment is.

Monday, February 2, 2015


Pro tip: How to unroot your Android device so you can update


If you're wanting to upgrade the firmware on your rooted device, you might have to jump through a couple of hoops first. 

Unroot
A while ago, you bit the bullet and rooted your Android device. The rooting gave you access to plenty of features and apps that you previously didn't have. You love it. However, you decide you want to update your Android OS, so you okay the update and watch as the download begins. Once it's complete, you tap the update button and your device reboots. When the booting process finally finishes, you see the failure message (Figure A).
Figure A

Figure A

A rooted Verizon-branded Samsung Galaxy S4 update failure.
What gives? The answer is simple... you can't update a rooted phone using the standard method. Instead, you have to use either the Samsung Kies or Mobile Odin Pro to flash the new Android version, but you lose root access. Once that's done, you'll have to reroot your device.
Fortunately, there is another way (there always is with Android). Instead of having to bother with either Kies or Odin (both can be a hassle), you can unroot the device with an app. For example, if you rooted with the SuperSU app, you can open that app, go to Settings, scroll all the way down, and tap the Full unroot button (Figure B).
Figure B

Figure B

Using SuperSU to unroot a device.
Once you tap the Full unroot button, tap Continue, and the unrooting process will begin. After a reboot, your phone should be clean of the root.
If you didn't use SuperSU to root your device, there's still hope. You can install an app called Universal Unroot to remove root from some devices. Note: The Galaxy Note 10.1, Galaxy MEGA, Galaxy S 4, Galaxy Note 2, and Galaxy Note 3 will not work with this app because of KNOX.
Once you've unrooted your device, you can go about the process of running the OTA Android update. After the update, reroot the device, and you're back... with the freshest Android OS and the power of root to boot.
Do your root your Android devices? If so, what is your preferred method? If not, why? Let us know in the discussion thread below.

How to easily root an Android device

Free Windows utility Kingo Android Root makes it a snap to take total control of just about any Android smartphone. Here's how to use it.
nexus-5-developer-7447.jpg
Tapping into Developer mode with Android 4.4.
Rooting is the Android equivalent of jailbreaking, a means of unlocking the operating system so you can install unapproved (by Google) apps, update the OS, replace the firmware, overclock (or underclock) the processor, customize just about anything, and so on.
Of course, for the average user, rooting sounds like -- and can be -- a scary process. After all, "rooting" around in your smartphone's core software might seem like a recipe for disaster. One wrong move and you could end up with bricked handset.
Thankfully, there's a new Windows utility that makes rooting a one-click affair: Kingo Android Root. It's free, and based on my initial tests with a Virgin Mobile Supreme, it works like a charm. (Be sure to check the compatibility list before you proceed, keeping in mind that although the Supreme wasn't on it, the utility had no problem with it.) Here's how to get started.
Step one: Download and install Kingo Android Root.

Screenshot by Yogesh
Step two: Enable USB debugging mode on your phone. If it's running Android 4.0 or 4.1, tap Settings, Developer Options, then tick the box for "USB debugging." (You may need to switch "Developer options" to On before you can do so.) On Android 4.2, tap Settings, About Phone, Developer Options, and then tick USB debugging." Then tap OK to approve the setting change.
On Android 4.3 and later (and some versions of 4.2), tap Settings, About Phone, then scroll down to Build Number. Tap it seven times, at which point you should see the message, "You are now a developer!"
Step three: Run Android Root on your PC, then connect your phone via its USB sync cable. After a moment, the former should show a connection to the latter.
kingo-root-updated.jpg
Screenshot by Kingo
Step four: Click Root, then sit back and wait while the utility does its thing. The aforementioned Supreme took all of about two minutes, including the automated reboot at the end.
And that's all there is to it. If you decide you want to reverse the process, just run Android Root again, connect your phone, then click Remove Root.
With that done, now you can take advantage of options like USB On-the-Go to make your unexpandable phone expandable . Hit the comments to share your favorite tricks for a rooted Android phone

Sunday, February 1, 2015

[OGWhatsApp] How To Use 2 Whatsapp Account In A Single Phone


2 Whatsapp Account | OGWhatsapp Dual Sim [NO ROOT]

OGWhatsApp: Whatsapp is now a days a big source of sending and receiving messages. It becomes a trend to chat with the friends. 90% of younger generation is now using whatsapp application in their mobile. And they use it on a regular basis.
Here now the biggest question comes in everyone’s mind is that…
  • can we use multiple whatsapp in a mobile??
  • can we use whatsapp dual sim??
  • can we have dual whatsapp account??
  • can we use 2 whatsapp account in single phone??
The more and more questions arises. So here we are having a solution for your question.
” The solution is OG WhatsApp 
dual-multiple-whatsapp-account

Whats is OGWhatsapp??

  • OGWhatsapp is a modded version of Whatsapp messenger for Android devices.
  • It is used to use 2 whatsapp account in one single android device i.e. dual whatsapp account for whatsapp dual sim
  • OG Whatsapp doesn’t require to ROOT your android device. [NO NEED OF ROOT]
Link To Download OG Whtasapp ===> http://ogwhatsapp.en.uptodown.com/android

Feature of OGWhatsapp:

  • 2 whatsapp account in one device (Android Device)
  • Whatsapp dual sim
  • Facility to backup and restore messages and data
  • Select app icon
  • and many more…

STEPS TO INSTALL OGWHATSAPP IN YOUR ANDROID DEVICES FOR 2 WHATSAPP ACCOUNT:

1. First take the full backup for your messages and data before going through OG Whatsapp:
og-whatsapp
2. Clear whatsApp data:
multiple-2-whatsapp-account


3. Go to /sdcard/WhatsApp folder and rename it to /sdcard/OGWhatsAp:
dual-whatsapp-account-ogwhatsapp
4. Uninstall Official WhatsApp
5. Install OGWhatsApp (Download links are given at bottom)


6. It will ask for your number. Give the old number which you have installed in official Whatsapp earlier.
multiple-whatsapp-dual-sim
7. Click OK
8. Now your OGWhatsApp is ready for old number
9. For second number to use, go to play store and download official WhatsApp application
10. It will ask for your number. Give the new second number.
whatsapp-dual-sim
Thatsheet: Now your mobile having multiple – 2 whatsapp account in single device (Whatsapp Dual Sim)


multiple-whatsapp